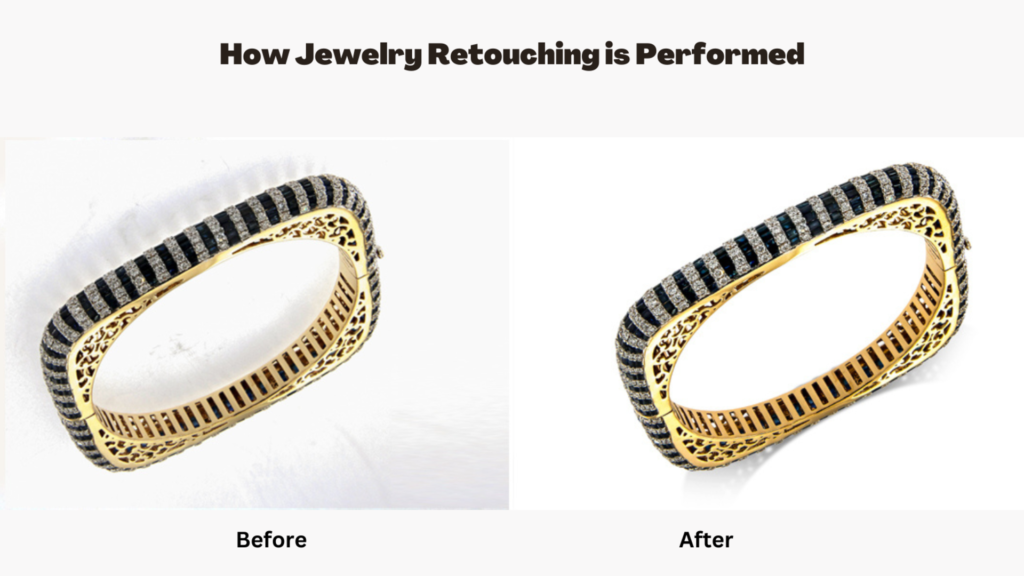
Most jewelry business owners are opting for jewelry photo retouching services from reputed companies to effectively enhance the beauty of their jewelry. Jewelry photo retouching is a process of enhancing the quality of jewelry images by removing flaws, correcting color and brightness, and adding realistic shadows and reflections. This enhances the visual appeal of the jewelry, making it more attractive to potential customers and thereby increasing sales. Moreover, it’s also an effective way to maintain a consistent brand image across all product listings.
But one question that always arises in the mind of the owner is how a dull jewelry image is converted into an attractive one. We’ve created this blog to answer that ‘How.’
The blog will help jewelry business owners understand the standardized process that Jewelry photo retouching services use to enhance their photos.
Steps Retouching Companies Use to Enhance Jewelry Photos
Every organization has a unique editing technique and style. However, there are some standard steps that each of them follows to edit your jewelry images.
Step 1: Adjust the Background and Create a Clean, Neutral Environment
Most eCommerce sites demand white or neutral backgrounds for the product. A piece of jewelry set against a white background draws more attention to the item and eliminates distractions, allowing the client to focus on the product itself. In this step, all parts of the jewelry layers are altered independently. For instance, a ring- the metals and stones of the ring are clipped into separate layers to create an unending white, non-distracting backdrop. This helps bring the focus on the minute stones and their shine.
Step 2: Add Natural Reflections and Shadows
Shadows are added to make objects in the pictures realistic. When it is added to jewelry images, it authenticates aspects of the jewelry. Natural shadows entice shoppers to keep their attention on the jewelry.
So, the editor chooses a tiny spot near the base of your jewelry piece, let’s say a necklace. By carefully refining the edge of your necklace, they create a soft, curving layer. Next, they darken that adjustment to create a dark oval at the bottom. This imitates dimension to the necklace to help it stand out in the foreground. This contributes to a realistic and 3D image of your piece.
Step 3: Color Correction and Color Grading
Sometimes photographers take dull or too bright images of the jewelry piece.
Thus, a correct balance of brightness and contrast must be maintained throughout the image to achieve acceptable exposure. This improves the quality of a photograph and makes it ideal for posting on websites and social media. So, the editor performs color correction on the image. Here, if your image is overexposed, they lower the brightness. Alternatively, if the image is underexposed, they increase the brightness. For example, an image shot under fluorescent light will seem overly bright or washed out. The editor alters such hues to give them a more natural appearance.
Step 4: Remove Blemishes or Imperfections From the Jewelry
No matter how hard photographers try to keep jewelry photos clean, the camera may capture dust, fingerprints, scratches, or blemishes. Generally, such imperfections are clearly visible in the image. So, the editor uses various healing brush tools to fix such imperfections in the image. This helps in correcting any damaged jewelry photos or removing any unwanted elements in post-processing without sacrificing the original quality of the photo.
Step 5: Enhance the Shine of the Jewelry
The shine of jewelry sometimes becomes dull after a photo shoot for a variety of reasons. For instance, a necklace may appear to be dull yellow instead of shiny golden. Hence, experienced editors opt for repainting it thereby ensuring that the natural shine of your items is retained in photographs with the same brightness and luminosity as in reality. For instance, a diamond in a ring must have a crystal-clear shine in the photograph to seem beautiful and real. The editor polishes this diamond, which attracts consumers.
Step 6: Sharpen the Details of the Jewelry
Unquestionably one of the most crucial elements of jewelry retouching is that it helps to bring out the detailing of the jewelry’s design. It is essential, especially in the case of side stones and diamonds. Editors use sharpening tools to display the detailed parts of the jewelry while removing blurriness from the image. After this, the customer can see the minute details of the diamond in terms of its shape, size, cuts, and design.
Step 7: Adjust Saturation To Change Colors
The term “saturation” relates to a color’s purity or strength. When a color’s saturation is enhanced, it seems brighter and more distinct. When the saturation of color decreases and begins to gray. Saturation is important in picture editing since it determines how to colorize or decolorize your image. It either adds to or detracts from the vibrancy of a scene. So, editors adjust the level of saturation and bring a balance to it.
Step 8: Enhance the Textures and Add Depth to the Jewelry
The next step is to add a smooth texture to the image. Texture adds another degree of depth to the image, making it dreamlike and artistic. It also showcases timelessness, which is extremely handy when you want to give your photos a vintage feel. Moreover, it helps to draw attention to every minute feature whilst projecting a dependable, premium, and opulent quality impression.
Step 9: Reduce Noise or Distortion from the Images
In low-light photography, “noise” refers to tiny, random, grainy specks. It takes the viewer’s attention away from the photo’s foreground, point of focus, and overall effect. It is typically visible in specific regions of some photos, particularly those with dark colors, or over the entire image in low-light shots. Noise, for whatever reason, can affect the quality of the image. Hence, an editor uses software and tools to deal with this and improve the overall quality of the image.
Conclusion
Hopefully, now you have clarity on how photo editing companies retouch your jewelry images. Retouching enhances the visual appeal of jewelry products and makes them look more attractive to potential customers. Through retouching, blemishes, scratches, and other imperfections can be removed, while the brightness, contrast, and saturation can be adjusted to make the jewelry appear more vibrant and eye-catching. Additionally, retouching can also help to create consistency in a product line by standardizing the look of all jewelry images.
Also Read: Graph Databases: What They Are and How They Are Priced